How I used Zero-Copy To Achieve Blazingly Fast File Transfers
Zero copy. Sounds fancy right? But the idea is quite simple. Just as the name suggests, it moves data with (nearly) zero CPU overhead, and zero detours through your application’s memory and just directly from kernel to kernel to achieve those blazingly fast transfer speeds.
This is what file transfers usually look like in Go:
io.Copy(w, file)
Looks neat, looks clean, gets the job done. But wait, what is it actually doing?
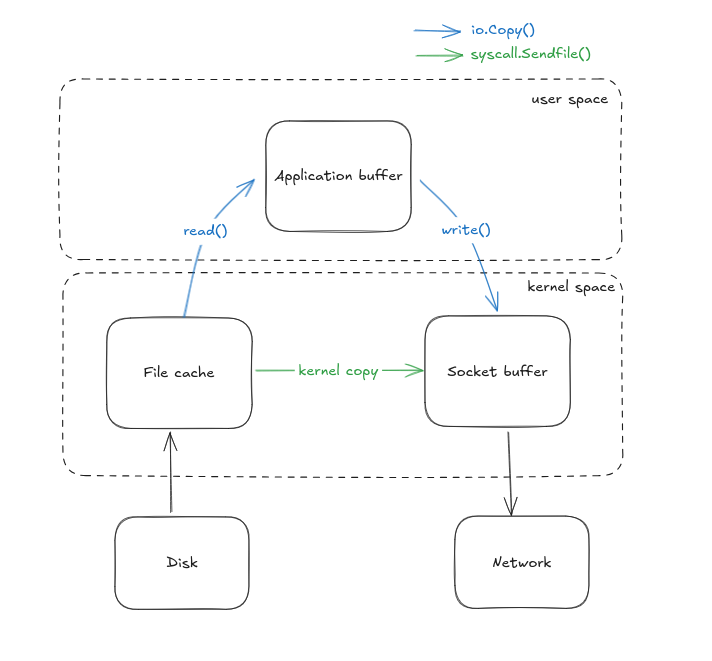
Behind the scenes, io.Copy() is quietly transferring data from kernel space to userspace and vice-versa. It mostly uses read() and write() syscalls to fetch data from the file cache to application buffer and send data from application buffer to socket buffer. That’s already two syscalls and multiple context switches and extra work for the CPU. It might not even matter for small files but when we’re dealing with Gigabytes of data, this slowly turns into a silent bottleneck.

So, what do we do? I was searching for a better alternative and it looks like there’s already a syscall in Linux: sendfile()that allows to copy data directly from the file cache to socket buffer in kernel space.
Well this solves the major problem but I was flooded with my internal monologues.
How do you implement it? Does it actually work? Are there any significant differences? Are there any tradeoffs?
Only way to find out was to get my hands dirty with some code and here we go.
Before I talk about sendfile(), this is how I implemented the same thing using io.Copy():
func handleWithIOCopy(w http.ResponseWriter, _ *http.Request) {
 fmt.Println("Handling with io.Copy")

 file, err := os.Open(videoPath)
 if err != nil {
  http.Error(w, "File not found", http.StatusNotFound)
  fmt.Println("Error opening file:", err)
  return
 }
 defer file.Close()

 stat, err := file.Stat()
 if err != nil {
  http.Error(w, "Failed to stat file", http.StatusInternalServerError)
  return
 }

 size := stat.Size()
 w.Header().Set("Content-Type", "video/mp4")
 w.Header().Set("Content-Length", strconv.FormatInt(size, 10))

 io.Copy(w, file)
 fmt.Println("Video streamed with io.Copy")
}
Now, let’s dump the comfy io.Copy() abstraction and dive deeper into the world of raw syscalls. But wait, what are syscalls actually?
Syscalls (also known as system calls) are the gateway or the interfaces through which the userspace application communicates with the kernel. They are how the applications ask stuffs like read from a file, write to a scoket, allocate memory and more. The applications cannot directly access the kernel or hardware so the only way to communicate is via syscalls.
Now here’s the catch: syscalls are slow.
Why?
- Multiple mode switches for the CPU
- Blocking behavior
- Inefficiency at scale
More on the syscalls on another blog. For now, let’s look at how we achieve Zero-Copy using sendfile().
sendfile()
sendfile() is a syscall provided by linux that helps to cut off that extra layer of userspace entirely. No need to ping pong the data between kernel space and user space and just do all the transfers directly in the kernel space without ever involving the application.
Implementing sendfile() in Go
Now that we have discussed what is sendfile() and why is it important. I wanted to implement it in a Go server. But the standard Go HTTP stack doesn’t expose sendfile() directly and we need to use the syscall package. I’ll be referring to syscall.Sendfile() or sendfile() interchangeably in this article and both should mean the same thing.
But syscall.Sendfile() uses file descriptors and http.ResponseWriter does not expose them directly. So, to work around this we need to hijack the underlying TCP connection
Let us see how we can do this:
// Try to cast responsewriter to http.Hijacker and get access to
// underlying TCP connection                                                                                                                                                                                                                                                                                                                                                                                                                                                                                                                                                                                                                                                                                                                                                                                                                                                                                                                                                                                                                                                                                                                                                                                                                                                                                                                                                                                                                                                                                                                                                                                                                                                                                                                                                                                                                                                                                                                                                                                                                                                                                    kj,x
hijacker, ok := w.(http.Hijacker)
 if !ok {
  http.Error(w, "Hijacking not supported", http.StatusInternalServerError)
  return
 }

 conn, _, err := hijacker.Hijack()
 if err != nil {
  http.Error(w, "Failed to hijack connection", http.StatusInternalServerError)
  return
 }
 defer conn.Close()
Here, we have hijacked the connection and we have bypassed Go’s response life cycle and are completely responsible for managing the connection which includes writing headers manually, streaming files ourselves and properly closing the socket after file transfer.
But wait, hijacker.Hijack() gives us the generic net.Conn interface but to use file descriptors, we need to assert this into *net.TCPConn
 tcpConn, ok := conn.(*net.TCPConn)
 if !ok {
  fmt.Println("Connection is not TCP")
  return
 }
 defer tcpConn.Close()
Now, since sendfile() uses input file descriptor for the file, we open the file and extract the fd:
 outFile, err := tcpConn.File()
 if err != nil {
  fmt.Println("Failed to get file from TCPConn:", err)
  return
 }
 defer outFile.Close()
 outFD := int(outFile.Fd())

 file, err := os.Open(videoPath)
 if err != nil {
  fmt.Fprintf(conn, "HTTP/1.1 404 Not Found\r\n\r\n")
  fmt.Println("File open error:", err)
  return
 }
 defer file.Close()
The next step is to call file.Stat() to get the information about the file and extract the size of the file. This is important because sendfile() doesn’t know how much data to send unless we explicitly tell them to. Also, we set the headers manually by using fmt.Fprintf since Go no longer handles them for us.
 stat, err := file.Stat()
 if err != nil {
  fmt.Fprintf(conn, "HTTP/1.1 500 Internal Server Error\r\n\r\n")
  fmt.Println("Stat error:", err)
  return
 }

 size := stat.Size()
 inFD := int(file.Fd())

 // Write headers manually
 fmt.Fprintf(conn, "HTTP/1.1 200 OK\r\n")
 fmt.Fprintf(conn, "Content-Type: video/mp4\r\n")
 fmt.Fprintf(conn, "Content-Length: %d\r\n", size)
 fmt.Fprintf(conn, "Connection: close\r\n\r\n")
Now we finally send the file using syscall.Sendfile()
 var offset int64 = 0
 for offset < size {
  sent, err := syscall.Sendfile(outFD, inFD, &offset, int(size-offset))
  if err != nil {
   fmt.Println("Sendfile error:", err)
   return
  }
  if sent == 0 {
   break
  }
 }
We have successfully implemented zero copy in go using syscall.sendfile()
What do the numbers say?
Now the actual question is: “Is it worth it?” because we wouldn’t want to do all these extra steps to achieve negligible results right? So let’s look at the some of the benchmarks I did locally.
Specifications used
- CPU: AMD Ryzen 5 4600H (6 cores, 12 threads)
- Max Clock Speed: 3.0 GHz
- Architecture: x86_64
- RAM: 16 GB DDR4
- OS: Ubuntu 24.04.2 LTS
- Virtualization: AMD-V
- L3 Cache: 8 MiB
Simulation environment
- Benchmark Tool: wrk for generating HTTP load
- Monitoring Tools: pidstat for recording per-second CPU and memory usage of the Go server process
- Duration: 120 seconds per test
- Concurrency: 6 threads, 30 connections
- Endpoints Tested:
- http://localhost:8080/video?method=io
- http://localhost:8080/video?method=sendfile
CPU Usage
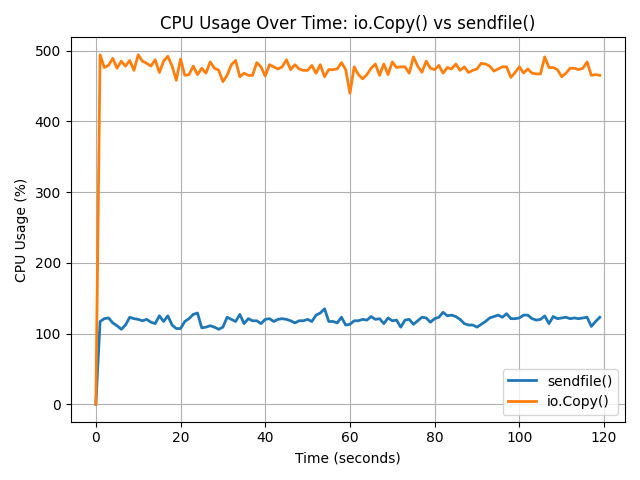
As expected CPU usage is significantly lower when using sendfile() because it eliminates the need to move data back and forth between user space and kernel space. As seen in the graph, io.Copy() consistently consumed around 480–500% CPU (across multiple cores), while sendfile() remained steady between 110–130%. This difference is due to sendfile() operating entirely within the kernel, reducing context switches and memory copying overhead. In larger scale data operations this creates a massive difference and using sendfile() allows to increase the overall responsiveness of the system.
Memory Usage

The memory usage suggests another reason to use sendfile() over io.Copy(). There are higher amount of page faults initially when using io.Copy() indicating frequent memory access and user-kernel transactions while sendfile() has fewer and stable page faults. Also, the memory usage is higher in sendfile() but reduces quickly and remains consistent around 13–14 mb consistently during the entire time whereas the memory usage in io.Copy() starts slow but increases rapidly in comparison to sendfile(). This is extremely important in resource constrained environments like embedded devices, edge devices, etc. where every megabyte counts.
Latency

We can see a clear difference when it comes to latency where sendfile() boasts 2.6x lower latency than that of io.Copy() making it superior in latency sensitive systems.
Request throughput performance
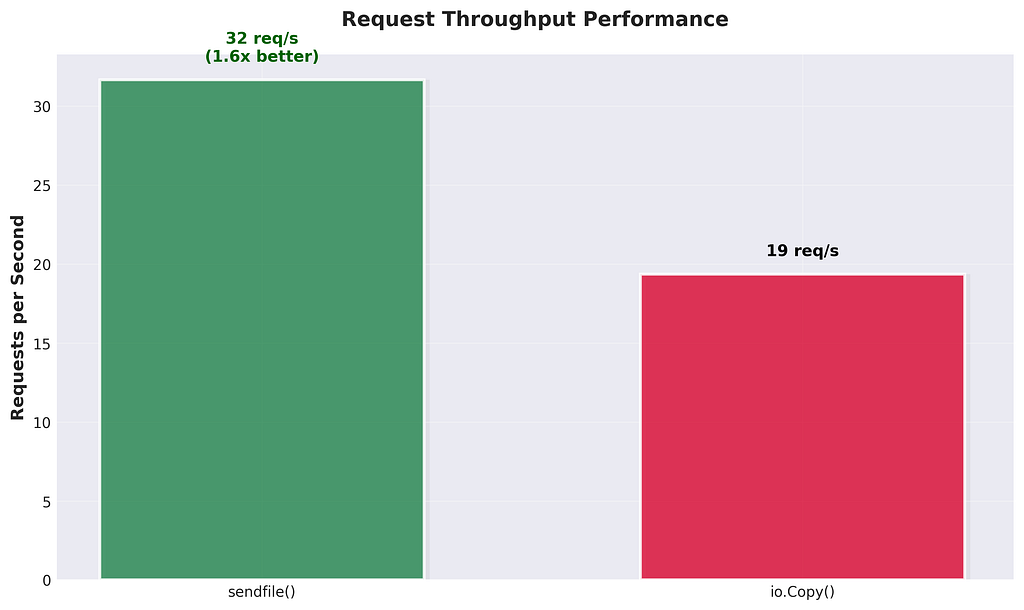
The difference is yet evident on request throughput performance where sendfile() was able to handle 32 requests/s whereas io.Copy() was able to only handle 19 requests/s where sendfile() clearly has more advantanges especially in systems that needs to handle high concurrency, high volume workloads, such as media servers or content delivery platforms.
Transfer Rate

The difference is quite visible when it comes to data transfer rates where sendfile() was able to hit 9.54 GB/s while io.Copy() capped out at 5.86 GB/s. That’s around 1.6x better, and again, it’s all because sendfile() skips the userspace detour. No need to move bytes into your app just to throw them back into a socket. This direct kernel-to-kernel transfer ends up making a big difference especially if you're dealing with large files or streaming workloads where raw transfer speeds actually matter.
wrk raw output (for the geeks)
# For io.Copy()
Running 2m test @ http://localhost:8080/video?method=io
  6 threads and 30 connections
  Thread Stats   Avg      Stdev     Max   +/- Stdev
    Latency     1.48s   224.64ms   2.00s    65.26%
    Req/Sec     4.53      4.04    38.00     85.19%
  2326 requests in 2.00m, 704.39GB read
  Socket errors: connect 0, read 0, write 0, timeout 81
Requests/sec:     19.35
Transfer/sec:      5.86GB

# For sendfile()
Running 2m test @ http://localhost:8080/video?method=sendfile
  6 threads and 30 connections
  Thread Stats   Avg      Stdev     Max   +/- Stdev
    Latency   567.85ms  273.85ms   1.82s    59.98%
    Req/Sec     4.95      0.66    12.00     83.52%
  3821 requests in 2.01m, 1.12TB read
Requests/sec:     31.67
Transfer/sec:      9.54GB
When not to use sendfile()
After going through all this you might be like “Screw userspace buffers, I’m using zero copy for everything”. I’m sorry my friend, it has it’s own limitations and you should not use sendfile() especially when:
- You refuse to use linux: I wouldn’t say “You don’t have linux” because linux is openly available to everyone. But if you decide to use something else like macos, sendfile() doesn’t work like it does on linux and has been reported to be slower than io.Copy() and for the windows users I’m sorry I don’t have any words for you.
- You need to modify data before transmission: Since sendfile() skips userspace, you cannot do stuffs like compression, encryption, etc.
- You are not dealing with file descriptors: Hear me out, previously it was not allowed to take socket as the input when using sendfile() but with latest linux versions ( 5.12+ ), sendfile() now can take socket as input but I just listed this out as trivia.
- You are working with HTTPS: Yes, you cannot use sendfile() with HTTPS because you cannot sign or encrypt data in kernel space. TLS expects to handle encryption in userspace which sendfile() bypasses entirely. BUT.. you can offload this to the kernel using ktls however Go’s official tls library natively doesn’t support ktls (well proposal has been submitted and accepted so we might see it in the future but it has lot of issues and is relatively premature to be rolling out soon)
Conclusion
So yeah, zero-copy with sendfile() isn't just some theoretical optimization, it's a real, practical performance boost that can seriously level up your file transfer speeds. Sure, it's not perfect and has its own imperfections, but if you're serving large static files, running a media server, or just want to push bytes fast without melting your CPU, then it's definitely worth getting your hands a little dirty.
Your CPU deserves a break. Let sendfile() take over
Here’s the github repo with the implementation: https://github.com/probablysamir/zero-copy-go.git